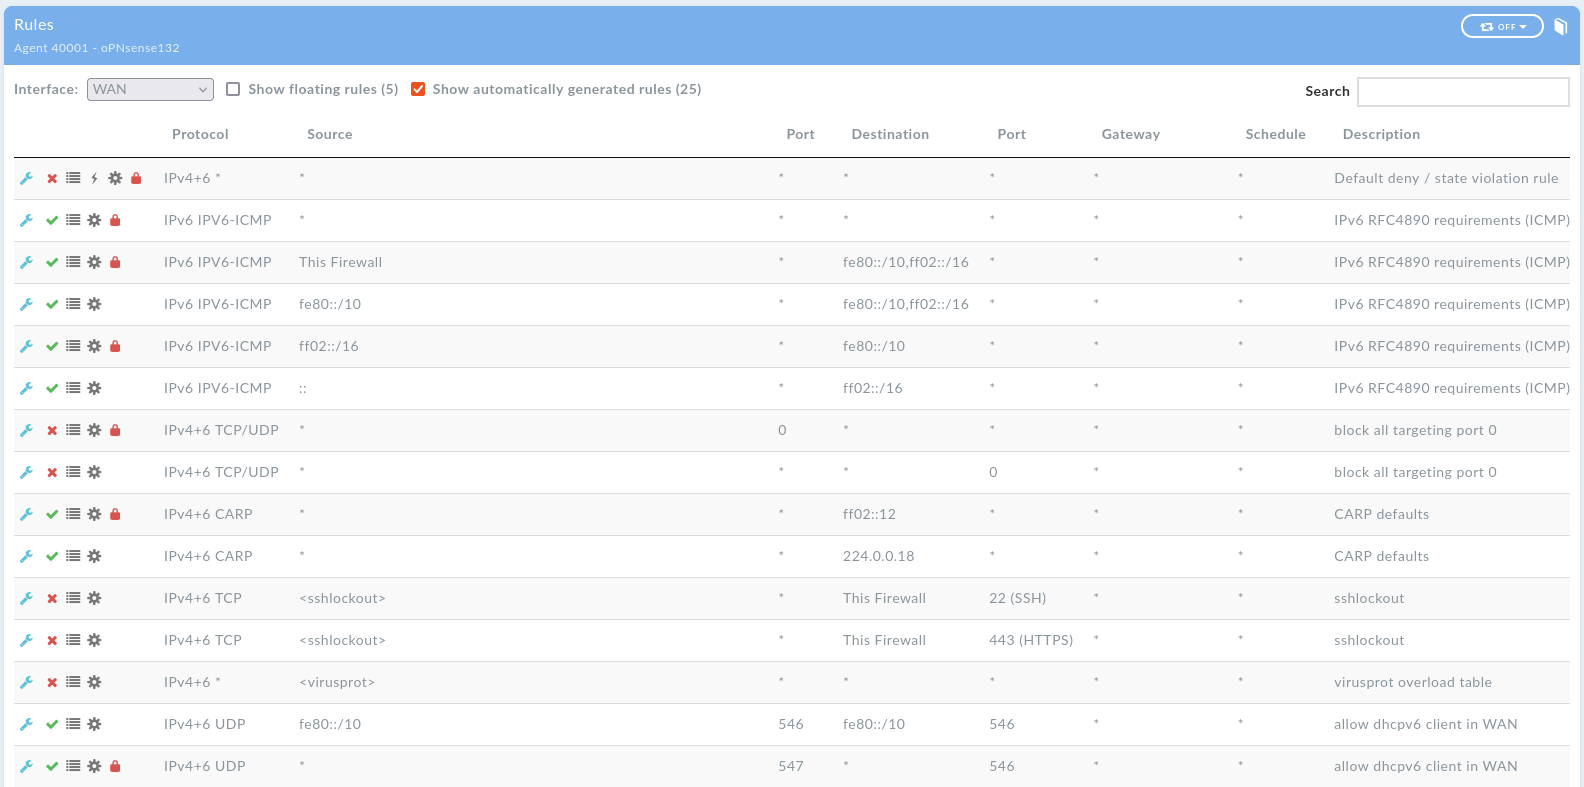
15. Firewall rules
Starting with DynFi Manager version 24.0, it is possible to view the rules of each connected firewall. The rule list is available for each device - choose “Rules” in device menu.
Rules are presented separately for each interface, with floating rules grouped in their own section. For each interface, it’s also possible to show or hide:
Floating rules which affect this interface,
Internal rules generated by the firewall or its plugins which affect this interface.
Some rule attributes are presented as icons to save space. Each icon (and some non-icon attributes) has a tooltip explaining its meaning. For alias-based rules, it is possible to check the source or destination alias without leaving the rule list. To see the alias details click on the alias icon. State details (traffic data such as packets or bytes sent) are displayed in a tooltip on hover. Please note that this live data can only be displayed if DFM is connected to the given device.
For a detailed explanation of each rule attribute, please consult your firewall documentation.
15.1. Managing rules directly from DynFi Manager
Starting with DynFi Manager version 26.0, it is possible to manage the rules of a connected firewall directly from the DynFi Manager interface, without needing to access the firewall’s own administration panel. This feature works in a way similar to the existing “Restrict rules” mode and provides full control over rule ordering and configuration.
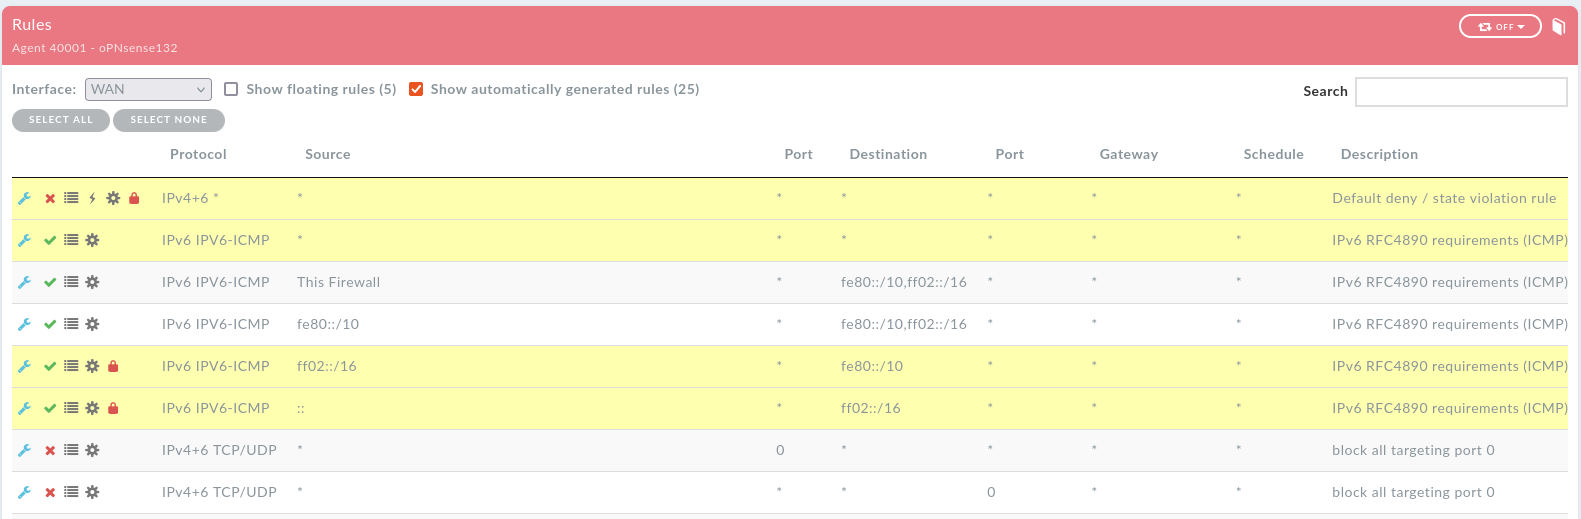
15.1.1. Entering Edit rules mode
On the Rules list page, click the Edit rules button at the bottom of the page to enter Edit rules mode. The page header turns red to clearly indicate that you are now in an active editing session, and an Apply changes and a Cancel button appear at the bottom of the page.
While in Edit rules mode, each rule row gains a set of action buttons on the right-hand side.

“Edit rules” mode
15.1.2. Selecting rules and reordering them
You can select one or more rules by clicking anywhere on their rows. Selected rows are highlighted. Once one or more rules are selected, use the arrow buttons on any rule row to reorder:
Arrow up (↑) — moves all selected rules above the rule whose arrow up button was clicked.
Arrow down (↓) — moves all selected rules below the rule whose arrow down button was clicked.
This allows you to precisely position a group of rules relative to any other rule in the list without dragging and dropping.
15.1.3. Editing a rule
Click the edit button (pencil icon, the first button below the arrow buttons) on a rule row to open the Modify rule modal window. The modal contains a form similar to the one available in the firewall’s own administration panel. It allows editing e.g.:
Action — the rule action (e.g. Pass, Block, Reject).
Disabled — check Disable this rule to disable the rule without deleting it.
Interface — the interface to which this rule applies.
TCP/IP Version — IPv4, IPv6, or both.
Protocol — the protocol to match (e.g. TCP, UDP, ICMP).
Source — source type and optional invert match, plus a port range (from / to).
Destination — destination type and optional invert match, plus a port range (from / to).
Log — optionally log packets handled by this rule.
The configuration covers all basic rule settings of each supported firewall and some advanced settings. After making your changes, click Modify rule to confirm them. The modal closes and the updated rule is reflected immediately in the list. The change is not yet sent to the firewall — it is accumulated along with any other pending changes in the current editing session.
For a full explanation of rule attributes and firewall-specific behaviour, consult your firewall’s documentation.
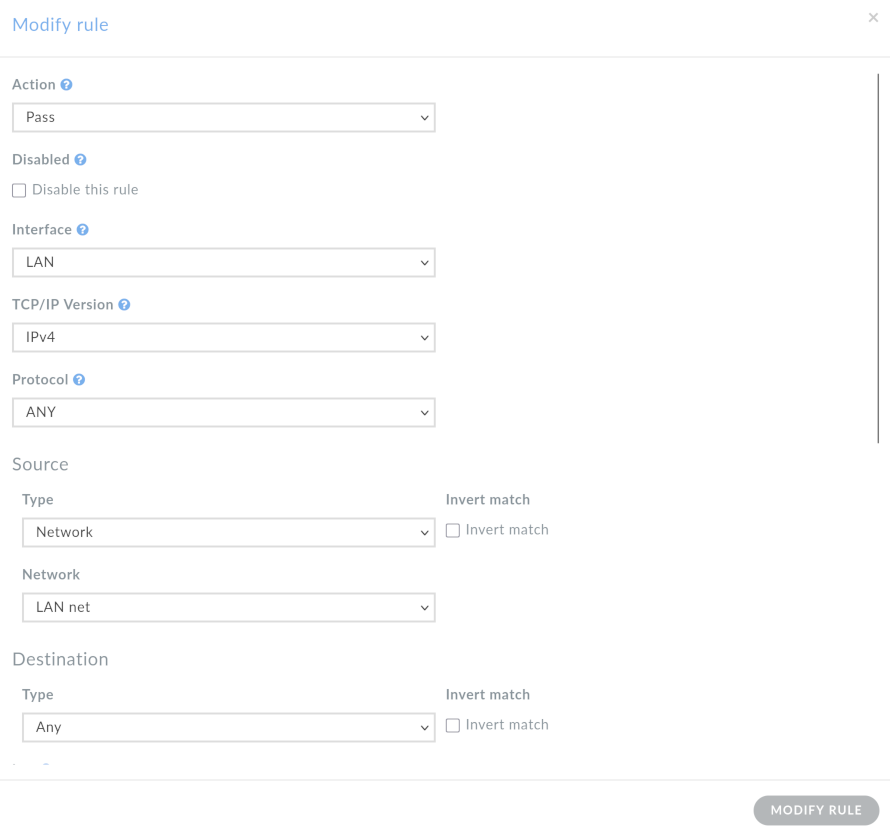
Edit modal
15.1.4. Adding a rule
Click the Add rule button at the bottom of the page to open Add rule modal window. The form is the same as in the case of editing a rule. New rule is added at the end of the rule list.
15.1.5. Cloning a rule
Click the clone button (the button immediately after the edit button) on a rule row to clone a rule. The cloned rule is added at the end of the rule list.
15.1.6. Disabling a rule
Click the disable button (the button immediately below the edit button) on a rule row to toggle the disabled state of that rule. Disabled rules are visually distinguished in the list (indicated by the color of pass/block/reject icon on on the left side of the rules row, consistent with how the firewall itself marks disabled rules). Disabling a rule is a non-destructive operation — the rule remains in the list and can be re-enabled at any time within the same or a future editing session.
15.1.7. Deleting a rule
Click the delete button (the last button in the action group, represented by a trash/remove icon) on a rule row to remove the rule from the list. The deletion is staged and will only take effect on the firewall once changes are applied.
Note
Deleting a rule cannot be undone within the current editing session. If you delete a rule by mistake, click Cancel to discard all pending changes and restore the rules to their last saved state.
15.1.8. Applying or cancelling changes
All modifications made during an Edit rules session - reordering, edits, disables, and deletions - are accumulated locally and are not sent to the firewall until you explicitly confirm them.
Apply changes sends all accumulated changes to the firewall. After the changes are applied, DynFi Manager reloads the rule list from the firewall to reflect the current state.
Cancel discards all pending changes and exits Edit rules mode, returning the rule list to its previous state.
Note
Reloading the rules from the firewall after applying changes ensures that the DynFi Manager view is always consistent with the actual firewall configuration, including any ordering or normalisation that the firewall may apply to rules internally. While the reload is in progress, all editing and management actions (including Edit rules, Restrict rules, and Check for new rules) are temporarily disabled.
15.1.9. Permissions
Create rules permission allows a user to enter Edit rules mode, reorder rules, modify rule properties, disable
rules, and delete rules. Users without this permission will not see the Edit rules button on the Rules list page.
15.2. Limiting access to the rules
In some cases it may be desirable to hide certain firewall rules from a group of DynFi Manager users. There are four permissions which affect rules:
Create- allows a user to download new rules from the firewall (and create new rules in future DynFi Manager versions),
Read- allows a user to view non-restricted rules,
Read restricted rules- allows a user to view all rules,
Restrict rules- allows a user to restrict the visibility of rules.
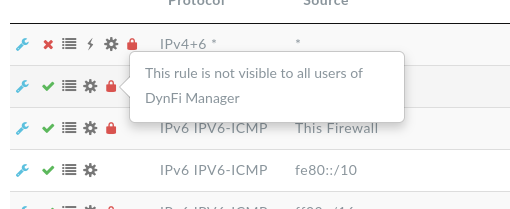
To hide a set of rules from a group of users, first create a role with the “Read” permission for rules (and none of the other three permissions) and assign this role to the selected users. Then, on the Rules list, use the “Restrict rules” button to enter admin mode and select the rules to hide. You can select rules for multiple interfaces before confirming the selection. The rules which have already been hidden are preselected.
Please note that the “Restrict rules” button is only visible to administrator and users with the “Restrict rules” permission.
“Restrict rules” mode
Once you confirm your selection, the rules are restricted. Administrator and users with the “Read restricted rules” permission can see restricted rules, which are marked with a red padlock icon. All users with only “Read” permission will not see these rules at all.
Admin view of restricted rules
Note
Due to technical constraints, it’s not possible to manage restrictions of OPNsense rules generated automatically by the firewall. Such rules are restricted by default and cannot be unrestricted manually. This constraint also affects OPNsense legacy rules which don’t have a UUID.